Saturday

Mulled Ale and Mulled Wine

Mulled wine
Mulled Wine
Photo Credit: http://la-oc-foodie.blogspot.co.uk

I don't know if there is anything as good as some mulled wine on a cold winter evening. Wine not exactly your cup of tea? No fear mulled ale is here!

What you will need to make these mulled drinks:

Mulled Ale (enough for 2.8L or 5 pints):

  • 2.5 L (4.5 pints) of strong ale
  • 300 ml (10 fl oz) of brandy
  • 2 tbsp of caster sugar
  • Large pinch of ground cloves
  • Large pinch of ground ginger

Mulled Wine (enough for 3.3 L or 5.75 pints):


  • 2 L (3.5 pints) of red wine
  • 850 ml (1.5 pints) of water 
  • 150 ml (5 fl oz) of brandy
  • 115 g (4 oz) of caster sugar
  • 2 cinnamon sticks
  • 5 oranges
  • 50 cloves
  • Thinly pared rind and juice of 4 lemons
Mulled Ale
Mulled Ale
Photo Credit: http://www.barwhiz.com


How to make mulled ale:
Put all of the ingredients in a heavy saucepan and heat gently, making sure to stir until the sugar has dissolved. Continue to heat so that its simmering but not boiling. Now remove the saucepan from the heat and serve the ale straight away in heatproof glasses.


Mulled Wine
Mulled Wine
Photo Credit: http://www.natashainoz.com

How to make the mulled wine:

Prick the skins of three of the oranges all over with a fork or a knife. Stuff the cloves into them like studs and put aside. Thinly pare the rind of the rest of the oranges and squeeze the juice from them.

Put the lemon and orange rind and juice, water, sugar, and cinnamon in a heavy saucepan and bring to the boil over a medium heat. Make sure to stir occasionally, until the sugar has dissolved. Boil for about 2 minutes without any stirring, remove from heat, stir it once and leave to sit for 10 minutes.

Strain the liquid into a heatproof jug. Make sure to press down on the contents of the sieve to extract all the juice and flavor.

Pour the wine into a separate saucepan and add the strained spiced juice, the brandy and the clove studded oranges that you set aside earlier. 

Simmer gently without boiling, then remove the saucepan from the heat.

Strain into heatproof glasses and serve hot.


Sunday

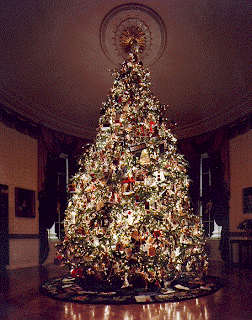
The Tradition of the Christmas Tree

The Tradition Of The Christmas Tree: Decorated Trees In Your Home

Christmas Tree
Christmas Tree


Evergreens were used to decorate homes during winter long before Christmas became a holiday. Evergreens were believed to keep witches, ghosts, evil spirits and illnesses
away from homes where they were displayed.

Germany is credited with the traditional Christmas Tree celebration of decorating trees and bringing them into their homes. It is believed that Martin Luther,
the 16th century Protestant reformer was the first to add lighted candles to the tree. He wanted to recapture the sparkling stars on a dark night and how the stars
illuminated his walk home, so he brought a tree into his home and placed it in the center of the room. He then wired the tree branches with lighted candles.

By 1890, Christmas ornaments were arriving in America from Germany and the Christmas tree became popular in the U.S. In the early 20th century most Americans
were using homemade ornaments on their trees. While Europeans liked their trees to be small, Americans liked their trees to reach from floor to ceiling. Popular homemade
ornaments included popcorn strings decorated by being dyed bright colors and laced with berries and nuts. Electricity changed the tree to include electric lights and trees
began to glow in town squares and in homes all across America, making the Christmas Tree, a American tradition.

Many cities claim to be the first city to have a Christmas tree in America including: Windsor Locks, a city in Connecticut. They claim that a Hessian soldier put up a
Christmas tree in 1777 while he was imprisoned at the Noden-Reed House, making it the first Christmas tree in New England.

Easton, Pennsylvania also claims that German settlers put up a Christmas tree in 1816. There is a diary entry made by Matthew Zahm, of Lancaster Pennsylvania,
which says a Christmas tree was put up in 1832.

A German immigrant living in Boston, Charles Follen, claimed the custom itself of decorating the Christmas tree. Another German immigrant from Wooster, Ohio
is said to have made popular the practice of decorating the Christmas tree by cutting down spruce trees from a wooded area by his town, and having a tinsmith
construct a star, he placed the tree in his house, decorating it with paper ornaments and candy canes. He was recognized by the National Confectioners' Association as
being the first to put candy canes on a Christmas tree. Those first candy canes were all white though and had no red stripes.

The Christmas tree today is a very important part of the celebration of Christmas. The tree symbolizes life.

Saturday

Alternative eco friendly gift wrap ideas


Wrapping gifts with alternatives to the pricey gift wrap is inexpensive but it does not by any means have to come across as “cheap”! Instead you could be the artistic one who’s skill and craftiness everyone admires. There are many ways to gift wrap without actually buying the pricey stuff. A lot of times you can re- use the wrapping material (no not the wrinkled ripped up wrapping paper with tape still stuck to it!) you already have or create wrap from non conventional methods.
I love using pages from the magazines to wrap gifts. We all have random magazines and papers lying around the house that are most likely collecting dust. Leaf through them, chances are they have random cool looking pages, some are ads, some photo shoots, it doesn't matter. Test try wrapping a book up in one of them, it comes out quite nice. Make sure the wrap is appropriate for a recipient, you don’t want to wrap your guys video game with something that has pretty butterflies on it, or that little girls hair set wrapped up with a cool biker dude on it.
Here are a few quick samples which I made for this article ... CLICK HERE TO READ THE FULL ARTICLE.

Tasty Rum Cookies recipe

These simple, yet delicious cookies are something that definitely doesn't get skipped in my household.


I think we all need a bit of alcohol in us from time to time, this goes for cookies too!


What you will need to make spiced rum cookies:

- 175g (6oz) of unsalted butter, softened and a bit extra for greasing
- 175g (6oz) dark muscovado sugar
- 225g (8oz) plain flour
- Pinch of salt
- 1/2 tsp bicarbonate of soda
- 1/2 tsp ground nutmeg
- 1/4 tsp ground coriander
- 1 tsp ground cinnamon
- 1/4 tsp ground cloves
- 2 tbsp dark rum

How to make spiced rum cookies:


To see the full recipe please click HERE.

Sunday

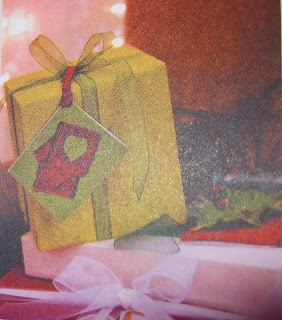
Make your own gift tags this season

Christmas Gift Tags
DIY Gift Tags


Materials:

  • 300 gsm white, red or green card
  • Red and sage-green felt
  • Sewing needle and deep red embroidery thread
  • Holly leaves
  • Deep red silk fabric scraps
  • Red ribbon
  • Craft knife, steel edged ruler, cutting mat, hole punch and double sided tape


  1.  Choose any color card paper to make your gift tags to the size you require. Cute out a rectangle shape with a craft knife and a steel edged ruler on a cutting mat (or if you are not stocked up with all the crazy crafts equipment improvise with scissors). 
  2. Punch a hole in the corner.
  3. Repeat the steps until you have as many rectangular cards as you need (one per tag).
  4. Attach the red felt to half of the card and the green felt to the other half of the cards using a double sided tape.
  5. Trim any excess off.
  6. Using a sewing needle and embroidery thread, sew holly leaves to the felt side of the red felt cards with one cross- stitch, tying the thread at the back and trimming the excess.
  7. Cut three small squares off the silk and using double sided tape, glue it to the felt side of the green felt cards overlapping them at jaunty angles.
  8. Add a small sage green felt heart to one of the silk squares with double sided tape.
  9. Thread a length of red ribbon through each hole and make a knot in the ribbon.  

Saturday

Pine cone ornaments


Christmas is a great time for projects, and almost anything can be adapted to display the holiday spirit! If you happen to be sick of seeing all of the plastic around year after year, or maybe if you are short on cash. Hey you might just be feeling really creative and are looking for a project you can do. A great choice is making pine cone Christmas tree ornaments. You can have a family evening of arts and crafts, or an afternoon crafts date with your girlfriends, heck even if you are alone its a great project. It costs hardly anything as well, since you most likely have all the things you need in your home already. And if not, they are cheap to buy.


What you will need to create your pine cone Christmas tree ornament:


- A pine cone, the number depends on how many ornaments you wish to make.


- A string of a sort, it can be sewing thread, fishing line, pretty ribbon, yarn, etc.


- Glue, either a hot glue gun or liquid crafts glue will do.


- Oil, tempera paints.


- Some paint brushes.


- Glitter, either in form of glitter pens, in paint or sprinkles.


- A plastic cup for water, this is for when you are painting. As well as a paper towel or two to clean the brushes.


- Old newspaper or other scrap to protect your work surface.


How to create your pine cone Christmas tree ornament:


- Before you start make sure you cover up your table, or other work surface with old news paper so it doesn't get ruined or dirty in case of any mishaps that are usually bound to happen during arts and crafts sessions.


- Now clean up your pine cone, get rid of any dirty or cob webs that might be on it. You can do this with a lightly damp paper towel.


- Once they are clean let them dry a few minutes. While they dry you could prepare your oil paints, water and brushes.


- After the pine cones are dried you are ready to decorate them. You can paint the whole pine cone in one color. You can go two tone, or one color per row. Really the options are endless, you just need to let your imagination run free. Golden, bronze and silver colors will make them look fancy, while bright colors will show off the more playful side.


- When done painting add some glitter. You should do this according to manufacturers instructions. And it depends on which type you get.


- After you have painted and glittered it up, once again let the pine cone dry completely.


- As for attaching the string so you can hang it, you can do this either buy tying it to the very tip of the pine cone, gluing it to the bottom. Or maybe you want it sideways in which case you can glue it in between the rows.


There are many variations of how to make these ornaments and with a little imagination and will they all come out looking spectacular.

Thursday

Make Your Own Christmas Cards

Make Your Own Christmas Cards


If you are on a real tight budget this Christmas or just love to be crafty during the holidays here are some wonderful homemade Christmas card ideas for you to try this holiday season.


Potato Stamp Cards:

Supplies you may need for your homemade Christmas Cards:

Paper Bags or Craft Paper

Potatoes or Sponges

Paint or colored ink

Ribbons

Hole Punch

Ink Pen

Paring Knife (adult supervision)

Plastic Plate

Scissors

Step #1 - Check to see if you can find any left over envelopes. You can look in old Christmas card boxes or the drawer where mom or dad pays the bills (ask first). If you find any unused envelopes you can use them and you will need to be sure that the cards you make will fit inside these cards.

Step #2 - Measure the envelope (if you didn't find any have mom or dad buy some for you).

Step #3 - Cut out the brown paper bag to be the same height as the card but twice as wide as the card.

Step #4 - Cut the potatoe in half with an adult helping.

Cut out a Christmas tree shape on the exposed side of the potato (white not the skin).

Cut away potato from the outer edge of the tree that surrounds the tree. You can use three potatoes to cut out different sizes of trees.

Step #5 - Put the paint or ink onto the plastic plate

Dip the Potato Tree into the paint or ink, now place it on what will be the front of your card (one tree or you can make a group of trees).

Step #6 - Make two holes with the hole punch about a centimeter apart below the Christmas tree.

Step #7 - Insert one end of the ribbon through the left hole, and then put it through the other hole. Loop each end around back and through the opposite hole. Now, pull the ribbon out the front of the card. Tie the ribbon into a pretty Christmas bow.

Step #8 - Use the scissors to trim the ribbon.

You can stamp more trees on the inside or write a holiday greeting.

You can also place Christmas stickers on the card or place crayon ornaments on the trees.

You can also decorate the envelopes too.

Use the sponge instead of the potato or buy stamps in the store.


Easy Construction Paper Cards:

Every child knows how to make Christmas cards out of construction paper. You just fold a piece of construction paper in half. Decorate the one outside half like the front of a Christmas greeting card and write a greeting on the inside of the card. Use Christmas colors (green, red, gold). Use Christmas stickers to decorate the cards if you wish.


Left Over Christmas Cards:

If your family saves old Christmas cards ask if you can use them to make new cards. 

You will need the old Christmas cards, construction paper, glue, pen, crayons or markers, and scissors to make these homemade cards.

Sort through the pile of old Christmas cards to find the front of your homemade card. Once you find one you like, cut the front off the old card. You can use parts and not the entire front if you like. You can also use more than one old card to make a different picture.

Fold the construction paper in half

Glue the old card picture onto the front of your construction paper card.

Using the pen, crayons or marker add to the picture, or draw new pictures to go with the old card picture.

Write a holiday greeting on the inside of the card with your pen. You can copy greetings from the old cards.

Wednesday

September is near the end, are you ready for Christmas?

As September end draws near there are a few more things the 'Christmas Pros' should check off their to-do list by now.

  • ADDRESS BOOK

If you are planning on sending out a bigger number of Christmas cards you should go through your address book and make sure it is updated. If anyone has moved you don't want to mail their Christmas cards to the wrong address!


  • TRAVEL PLANS
Spending the holidays away? Fantastic! Just please make sure you do not wait too long to realize your plans.  By now, at the latest, you should have finalized any travel plans you have and booked the tickets in advance, if at all possible.

Saturday

Christmas Cake Recipe

Yes, it is still August and yes, I am writing a recipe for a Christmas Cake. There are many recipes out there and although they all call for the cake to be made in advance the times vary greatly, from a couple of weeks to a couple of years before serving.
Crazy right?! No cake could go untouched for that long in my house!

If you don't fancy baking one yourself visit http://www.englishchristmascake.com and they will do it for you!

Makes a 20cm / 8in Christmas Cake


  • 150g/5oz raisins
  • 125g/4.5oz dried dates, stoned and chopped
  • 125g/4.5oz sultanas
  • 100g/3.5oz candied cherries, rinsed
  • 150ml/5 fl oz brandy
  • 225g/8oz butter, plus extra for greasing
  • 200g/7oz caster sugar
  • 4 eggs
  • grated rind of 1 orange
  • grated rind of 1 lemon
  • 1tbsp black treacle
  • 225g/8oz plain flour 
  • 1/2 tsp salt
  • 1/2 tsp baking powder
  • 1 tsp mixed spice
  • 25g/1oz toasted almonds, chopped
  • 25g/1oz toasted hazelnuts, chopped
  • 750g/1lb 10oz marzipan
  • 3 tbsp apricot jam, warmed
  • 3 egg whites
  • 650g/1lb 7oz icing sugar
  • Edible decorations of your choice
The recipe which I use states to make this Christmas Cake AT LEAST 3 weeks prior. I will be making it in September this year.
  1. Put all the fruit in a bowl and pour over the brandy. Cover and leave to soak overnight.
  2.  Preheat the oven to 110C/225F/Gas Mark 1/4. Grease a 20cm/8in cake tin with butter and line it with grease proof paper. Cream the remaining butter and the caster sugar in a bowl until fluffy. Gradually beat in the eggs. Stir in the citrus rind and treacle. Sift the flour, salt, baking powder and mixed spice into a separate bowl, then fold into the egg mixture. Fold in the soaked fruit and brandy and the nuts, then spoon the mixture into the prepared cake tin.
  3. Bake in the preheated oven for at least 3 hours. If it browns too quickly cover with foil. The cake is cooked when a skewer inserted into the centre comes out clean. Remove from the oven and leave to cool on a wire rack. Store in an airtight container until required.
  4. Roll out the marzipan and cut to shape to cover the top and sides of the cake. Brush the cake with the jam and press the marzipan on to the surface. Make the icing by placing the egg whites in a bowl and adding the icing sugar a little at a time, beating well until the icing is a very thick and will stand up in peaks. Spread over the covered cake, using a fork to give texture. Decorate your Christmas Cake as you wish with the edible decorations of your choice.